2017年7月31日 星期一

Fast Style Transfer in TensorFlow

Ref: https://github.com/lengstrom/fast-style-transfer

Windows 10 x64 @ ASUS X450J
1. Install tensorflow (ref: https://www.tensorflow.org/install/install_windows)
1-1 c:\conda create -n tensorflow python=3.5
1-2 activate tensorflow
1-3 pip install --ignore-installed --upgrade https://storage.googleapis.com/tensorflow/windows/cpu/tensorflow-1.2.1-cp35-cp35m-win_amd64.whl

--- nstall the CPU-only version of TensorFlow

2. python evaluate.py --checkpoint udnie.ckpt --in-path INimgs --out-path OUTimgs
2-1 error no module for scipy
2-1-1 download scipy-0.19.1-cp35-cp35m-win_amd64.whl (http://www.lfd.uci.edu/~gohlke/pythonlibs/)
2-1-2 pip install scipy-0.19.1-cp35-cp35m-win_amd64.whl

2-2 ImportError: cannot import name 'NUMPY_MKL'
2-2-1 download numpy-1.13.1+mkl-cp35-cp35m-win_amd64.whl
2-2-2 pip install numpy-1.13.1+mkl-cp35-cp35m-win_amd64.whl

2-3 AttributeError: module 'scipy.misc' has no attribute 'imread'
2-3-1 download Pillow-4.2.1-cp35-cp35m-win_amd64.whl
2-3-2 pip install Pillow-4.2.1-cp35-cp35m-win_amd64.whl

2-4  'Resize images or use --allow-different-dimensions.'

3. Download udnie.ckpt (https://drive.google.com/drive/folders/0B9jhaT37ydSyRk9UX0wwX3BpMzQ)

4. python evaluate.py --checkpoint udnie.ckpt --in-path INimgs --out-path OUTimgs --allow-different-dimensions


5. Results

6. python transform_video.py --in-path INimgs/joy.mp4 --checkpoint udnie.ckpt --out-path OUTimgs/joy.mp4

fail due to lack of ffmpeg

6.1 Install ffmpeg

6.2 OK. 


2017年6月30日 星期五

Docker NETCore Application Created by Visual Studio 2017

REF:http://kevintsengtw.blogspot.tw/2016/11/docker-for-windows-aspnet-core-part1.html

 Visual Studio 2017/
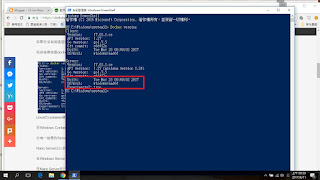
PS C:\Windows\system32> docker version
Client:
 Version:      17.06.0-ce
 API version:  1.30
 Go version:   go1.8.3
 Git commit:   02c1d87
 Built:        Fri Jun 23 21:30:30 2017
 OS/Arch:      windows/amd64

Server:
 Version:      17.06.0-ce
 API version:  1.30 (minimum version 1.12)
 Go version:   go1.8.3
 Git commit:   02c1d87
 Built:        Fri Jun 23 21:51:55 2017
 OS/Arch:      linux/amd64
 Experimental: true

1. VS2017 open new NETCore WebApplication (Enable for Docker)
2. Share C:\ ??

3.Enable app
4. Show web app


5.Check Container

6.Close VS2017 project/ Web App (Container) is still running

7. Run image created by VS 2017
7-1 Build project in release mode
7-2 The images file will be shown xxxx:latest rather than xxxx:dev. The late is created by debug mode.
7-3 docker run -d -p 1234:80 --name app1 webapplication1:latest

8. The container will be down when the VS 2017 project was stop. The container will be working as that by debug mode.


2017年6月26日 星期一

docker php hello world


Ref: http://mmenozzi.github.io/2016/01/22/php-web-development-with-docker/
1. docker run -p 80:80 webgriffe/php-apache-base
2. Test w3school php tutorials

3. Test file upload example (confirm FileUpload enable)

3-1 prepare ex5.php and upload.php
3-2 login container
       docker exec -it #ID /bin/bash
       mkdir uploads   (@ /var/www/html)
       chmod 777 upload
3-3 test ex5.php
<!DOCTYPE html>
<html>
<body>

<form action="upload.php" method="post" enctype="multipart/form-data">
    Select image to upload:
    <input type="file" name="fileToUpload" id="fileToUpload">
    <input type="submit" value="Upload Image" name="submit">
</form>

</body>
</html>


Fail---
Ref: https://github.com/rmuch/docker-php-hello-world


1, git clone https://github.com/rmuch/docker-php-hello-world.git
2. docker build -t docker-php-hello-world .
3.

2017年6月23日 星期五

gitlab in docker

Ref:https://jigsawye.com/2015/09/25/gitlab-ce-in-docker/   (A student provided)

1. docker pull sameersbn/gitlab:8.0.2
2. docker run --name gitlab-postgresql -d --env 'DB_NAME=gitlabhq_production' --env 'DB_USER=gitlab' --env 'DB_PASS=password' --volume /srv/docker/gitlab/postgresql:/var/lib/postgresql sameersbn/postgresql:9.4-3

3. docker run --name gitlab-redis -d --volume /srv/docker/gitlab/redis:/var/lib/redis sameersbn/redis:latest

4. docker run --name gitlab -d --link gitlab-postgresql:postgresql --link gitlab-redis:redisio --publish 10022:22 --publish 10080:80 --env 'GITLAB_HOST=your-gitlab-ip' --env 'GITLAB_PORT=10080' --env 'GITLAB_SSH_PORT=10022' --env 'GITLAB_SECRETS_DB_KEY_BASE=long-and-random-alpha-numeric-string' --volume /srv/docker/gitlab/gitlab:/home/git/data sameersbn/gitlab:8.0.2

打開瀏覽器瀏覽 http://localhost:10080,就可以看到 Gitlab 架設好了,輸入預設的帳號密碼就可以直接登入:

username: root
password: 5iveL!fe


2017年6月16日 星期五

Deploy an ASP.NET Core MVC on Linux with Docker (II)

Ref:https://stormpath.com/blog/tutorial-deploy-asp-net-core-on-linux-with-docker

1. Creating an ASP.NET Core MVC project

2. Powershell: Dotnet run for testing
3. If  the following error occurs
    unable to start Kestrel, open 工作管理員, terminate dotnet.exe process
4. Building a Dockerfile for ASP.NET Core
--- Dockerfile
FROM microsoft/dotnet:latest
COPY . /app
WORKDIR /app

RUN ["dotnet", "restore"]
RUN ["dotnet", "build"]

EXPOSE 5000/tcp
ENV ASPNETCORE_URLS http://*:5000

ENTRYPOINT ["dotnet", "run"]
----
Save into folder of  WebApplication1

5. Creating the Docker image @ folder of  aspnetcoreMVC
docker build -t mydemos:aspnetcoreMVC .

6. Test
docker run -d -p 8080:5000 -t mydemos:aspnetcoreMVC


ASP-NET-Core-Unable-to-Start-Kestrel/

Ref: https://blackie1019.github.io/2017/03/10/ASP-NET-Core-Unable-to-Start-Kestrel/

1.  Core MVC fail to start in command mode
PS D:\Dockers\WebApplication1\WebApplication1> dotnet run
crit: Microsoft.AspNetCore.Server.Kestrel[0]
      Unable to start Kestrel.
....

2. 開啟工作管理員
3. Terminate dotnet
4. re-Run

2017年6月14日 星期三

Google Map API for WPF (C#)

Ref: https://github.com/maximn/google-maps

ASUS X460J /Windows 10 x64 edu/ Visual Studio 2017 Prof

1. Console mode
1.1 New Project (Console mode)
1.2 nuget Add ref GoogleMapsApi

1.3 Copy / paste / modified
using System;
using System.Collections.Generic;
using System.Linq;
using System.Text;
using System.Threading.Tasks;
// 1. Add GoogleMapAPI
// 2. Coding by  https://github.com/maximn/google-maps


namespace ConsoleApp1
{
    // 2.1 Add using
    using GoogleMapsApi;
    using GoogleMapsApi.Entities.Common;
    using GoogleMapsApi.Entities.Directions.Request;
    using GoogleMapsApi.Entities.Directions.Response;
    using GoogleMapsApi.Entities.Geocoding.Request;
    using GoogleMapsApi.Entities.Geocoding.Response;
    using GoogleMapsApi.StaticMaps;
    using GoogleMapsApi.StaticMaps.Entities;
    class Program
    {
        static void Main(string[] args)
        {
            // 2.2 Paste code ---
            //Static class use (Directions) (Can be made from static/instance class)
            DirectionsRequest directionsRequest = new DirectionsRequest()
            {
                // 2.3 Change Address for Direction
                //Origin = "NYC, 5th and 39",
                //Destination = "Philladephia, Chesnut and Wallnut",
                Origin = "醒吾科技大學",
                Destination = "林口Outlet",
            };

            DirectionsResponse directions = GoogleMaps.Directions.Query(directionsRequest);
            Console.WriteLine(directions);

            //Instance class use (Geocode)  (Can be made from static/instance class)
            GeocodingRequest geocodeRequest = new GeocodingRequest()
            {
                // 2.4 Change for geocoding
                // Address = "new york city",
                Address = "粉寮路一段101號",
            };
            var geocodingEngine = GoogleMaps.Geocode;
            GeocodingResponse geocode = geocodingEngine.Query(geocodeRequest);
            Console.WriteLine(geocode);

            // Static maps API - get static map of with the path of the directions request
            StaticMapsEngine staticMapGenerator = new StaticMapsEngine();

            //Path from previos directions request
            IEnumerable<Step> steps = directions.Routes.First().Legs.First().Steps;
            // All start locations
            IList<ILocationString> path = steps.Select(step => step.StartLocation).ToList<ILocationString>();
            // also the end location of the last step
            path.Add(steps.Last().EndLocation);

            string url = staticMapGenerator.GenerateStaticMapURL(new StaticMapRequest(new Location(40.38742, -74.55366), 9, new ImageSize(800, 400))
            {
                Pathes = new List<GoogleMapsApi.StaticMaps.Entities.Path>(){ new GoogleMapsApi.StaticMaps.Entities.Path()
    {
            Style = new PathStyle()
            {
                    Color = "red"
            },
            Locations = path
    }}
            });
            Console.WriteLine("Map with path: " + url);
            // 2.4 Pause
            Console.ReadLine();
        }
    }
}

1.4 Results


2. WPF
2.1 Apply Google Map API Key for

2.2 New WPF project
2.3 Add tag
     <Grid>
        <Image Name="image1" />
    </Grid>
2.4 Add C# Coding @ Window_Loaded
private void Window_Loaded(object sender, RoutedEventArgs e)
        {
            // 3. Add Console Code
            // 2.2 Paste code ---
            //Static class use (Directions) (Can be made from static/instance class)
            DirectionsRequest directionsRequest = new DirectionsRequest()
            {
                // 2.3 Change Address for Direction
                //Origin = "NYC, 5th and 39",
                //Destination = "Philladephia, Chesnut and Wallnut",
                Origin = "醒吾科技大學",
                Destination = "林口Outlet",
            };

            DirectionsResponse directions = GoogleMaps.Directions.Query(directionsRequest);
            //Console.WriteLine(directions);

            //Instance class use (Geocode)  (Can be made from static/instance class)
            GeocodingRequest geocodeRequest = new GeocodingRequest()
            {
                // 2.4 Change for geocoding
                // Address = "new york city",
                Address = "粉寮路一段101號",
            };
            var geocodingEngine = GoogleMaps.Geocode;
            GeocodingResponse geocode = geocodingEngine.Query(geocodeRequest);
            //Console.WriteLine(geocode);

            // Static maps API - get static map of with the path of the directions request
            StaticMapsEngine staticMapGenerator = new StaticMapsEngine();

            //Path from previos directions request
            IEnumerable<Step> steps = directions.Routes.First().Legs.First().Steps;
            // All start locations
            IList<ILocationString> path = steps.Select(step => step.StartLocation).ToList<ILocationString>();
            // also the end location of the last step
            path.Add(steps.Last().EndLocation);
            // 4. Choose Map center
            int mid = path.Count / 2;
            string url = staticMapGenerator.GenerateStaticMapURL(new StaticMapRequest(path[mid], 12, new ImageSize(800, 400))
            {
                Pathes = new List<GoogleMapsApi.StaticMaps.Entities.Path>(){ new GoogleMapsApi.StaticMaps.Entities.Path()
                {
                    Style = new PathStyle()
                     {
                            Color = "red"
                      },
                    Locations = path

                }},
                // 5. Add ApiKey
                ApiKey = "Google_Static_MAP_API_Key"
            });
            //Console.WriteLine("Map with path: " + url);
            // 6. Add code for url map
            // 7. Add using
            if (url != null)
            {

                Uri uri = new Uri(url);
                //Uri uri = new Uri("http://maps.google.com/staticmap?center=45.728220,4.830321&zoom=8&size=200x200&maptype=roadmap&key=AIzaSyDwDqtZGEPqmoMw-UQ3-WGm0gLt987C5Ko");
                System.Net.HttpWebRequest httpRequest = (System.Net.HttpWebRequest)HttpWebRequest.Create(uri);

                HttpWebResponse httpResponse = (HttpWebResponse)httpRequest.GetResponse();
                Stream imageStream = httpResponse.GetResponseStream();
                Bitmap buddyIcon = new Bitmap(imageStream);
                httpResponse.Close();
                imageStream.Close();
                //---

                image1.Source = ToBitmapImage(buddyIcon);

            }
            // 2.4 Pause
            //Console.ReadLine();
        }
        public BitmapImage ToBitmapImage(Bitmap bitmap)
        {
            using (var memory = new MemoryStream())
            {
                bitmap.Save(memory, System.Drawing.Imaging.ImageFormat.Png);
                memory.Position = 0;

                var bitmapImage = new BitmapImage();
                bitmapImage.BeginInit();
                bitmapImage.StreamSource = memory;
                bitmapImage.CacheOption = BitmapCacheOption.OnLoad;
                bitmapImage.EndInit();

                return bitmapImage;
            }
        }
2.5 Result

2017年6月11日 星期日

Docker windows container

Ref: https://dotblogs.com.tw/swater111/2017/01/11/173456

1. Switch to Windows containers..
    System auto re-boot

2. docker search microsoft

3. docker run -it microsoft/nanoserver powershell.exe

4. Check version
[environment]::OSVersion.Version

5. ctrl+p ctrl+Q

6. docker ps


7. docker pull nanoserver/iis


8. Check IP
PS C:\> docker inspect -f "{{ .NetworkSettings.Networks.nat.IPAddress }}" 232

172.22.29.38


9.

Deploy an ASP.NET Core Application on Linux with Docker (I)

Ref: https://stormpath.com/blog/tutorial-deploy-asp-net-core-on-linux-with-docker

1. Creating an ASP.NET Core project

mkdir AspNetCoreHelloWorld
cd AspNetCoreHelloWorld
dotnet new  web
 --- Check
dotnet restore
dotnet run
The project should start listening on http://localhost:5000. Try it out in your browser!

2. Building a Dockerfile for ASP.NET Core
--- Dockerfile
FROM microsoft/dotnet:latest
COPY . /app
WORKDIR /app

RUN ["dotnet", "restore"]
RUN ["dotnet", "build"]

EXPOSE 5000/tcp
ENV ASPNETCORE_URLS http://*:5000

ENTRYPOINT ["dotnet", "run"]
----
Save into folder of  aspnetcorehelloworld

3.  Creating the Docker image @ folder of  aspnetcorehelloworld
docker build -t mydemos:aspnetcorehelloworld .

4. Test
docker run -d -p 8080:5000 -t mydemos:aspnetcorehelloworld


2017年6月6日 星期二

Unity 2D step by step

Ref: https://www.raywenderlich.com/69392/make-game-like-jetpack-joyride-unity-2d-part-1

1.  Open new project (2D)
2.  Default Main camera
3.  Configuring Game View (iphone 1136x640)

4. Importing Game Assets

5. Adding Player to the Scene
5.1 Change its name to mouse
5.2 Set its Position to (0, 0, 0).
5.3 Add a Circle Collider 2D component. Physics 2D /Circle Collider 2D/Set the Radius of the Circle Collider 2D component to 0.5.
5.4 Add a Rigidbody 2D component, by clicking Add Component and selecting Physics 2D\Rigidbody 2D.
5.5 Enable the Fixed Angle checkbox inside the Rigidbody 2D component.
      freeze rotation z (Check)
(https://stackoverflow.com/questions/30794689/why-i-cant-see-fixed-angle-option-in-rigidbody2d-in-the-new-unity5)

6. Test run. Mouse 依據設定重量與重力場,垂直落下。
7. Add Script C#
using System.Collections;
using System.Collections.Generic;
using UnityEngine;

public class mouseController : MonoBehaviour {

    public float jetpackForce = 75.0f;
    private Rigidbody2D rb2d;

    // Use this for initialization
    void Start () {
        rb2d = GetComponent<Rigidbody2D>();
    }

// Update is called once per frame
void Update () {

}
    void FixedUpdate()
    {
        bool jetpackActive = Input.GetButton("Fire1");  // Fire1 is defined by default in Unity as a left mouse button click

        if (jetpackActive)
        {
         
            rb2d.AddForce(new Vector2(0, jetpackForce));  // 
        }
    }
}
8. Test run , Mouse click may add jetforce once per click.

9. Adding the Floor and the Ceiling
9.1 GameObject\Create Empty
9.2 Rename it to floor.
9.3 Set its Position to (0, -3.5, 0).
9.4 Set its Scale to (14.4, 1, 1).
9.5 Click Add Component and add a Box Collider 2D component by selecting Physics 2D\Box Collider 2D.
9.6 Create ceiling @ (0, 3.7, 0)

10. Creating a Particle System
10.1 Rename the Particle System to jetpackFlames.
10.2 Set its Position to (-0.62, -0.33, 0) to move it to the jetpack nozzle.
10.3 Set its Rotation to (65, 270, 270) to set the direction at which the particles will be emitted.
Still in the Inspector, find the Particle System component and set following properties:
10.4 Set Start Lifetime to 0.5
10.5 Set Start Size to 0.3
10.6 Click on Start Color and set Red to 255, Green to 135, Blue to 40 and leave Alpha at 255. You should get a nice orange color.
10.7 Expand Emission section and set Rate to 300. Make sure you don’t uncheck the checkbox to the left of Emission section and disable it.
10.8 Expand Shape section. Make sure Shape is set to Cone and set Angle to 12 and Radius to 0.1. 10.9 Finally enable the Random Direction checkbox. (Random Direction = 1)
10.10 Color over Lifetime

11. Add background
12. Add layers setting and bg-> background, mouse -> Player
13. Fixed particle system bug (Fail to  change the layer of jetPackFlame by  C#  script)
Ref: http://answers.unity3d.com/questions/912639/unity2d-sorting-layers-with-particle-systems.html
Change the layer by inspector

14. Decorating the Room


2017年5月31日 星期三

Visual Studio 2017 Android Emulator vs Docker for Windows

HW: ASUS X450J OS: Windows 10 Edu x64 1703

1. Docker for windows is running after startup by default setting.
2. The emulator can not work after installation of docker for windows.
3. Actions:
3.1  bcdedit /set hypervisorlaunchtype off
3.2  Download hyper-V Android emulator and install it
https://www.visualstudio.com/zh-hant/vs/msft-android-emulator/?rr=https%3A%2F%2Fwww.google.com.tw%2F
3.3 Re-start Windows 10
3.4  Docker was fail to startup and VS 2017 shows "VisualStudio"AndroidEmulatiomn
4. Notes: the App1 was installed in the emulation, it should be uninstalled before you deploy the app in the same name as App1.


5. bcdedit /set hypervisorlaunchtype auto start
5.1 Reboot
5.2 Docker works again.