2022年11月5日 星期六

Google DriveToWeb jpg file blocked by CORS policy

Demo link

https://aframe-gallery.glitch.me/

Description information

https://aframe.io/docs/1.3.0/guides/building-a-360-image-gallery.html

1. Copy example into drivetoweb @ Google

2. Replace https://cdn.aframe.io/360-image-gallery-boilerplate/img/city.jpg by local jpg file

3. CORS error

Access to fetch at 'https://drive.google.com/uc?id=1axbPxNB1yL-tdZbKyt__jbjrFYSphzRm' (redirected from 'https://uezbafchzoobug0w05g98q.on.drv.tw/www.092012a.io/GT1.jpg') from origin 'https://uezbafchzoobug0w05g98q.on.drv.tw' has been blocked by CORS policy: No 'Access-Control-Allow-Origin' header is present on the requested resource. If an opaque response serves your needs, set the request's mode to 'no-cors' to fetch the resource with CORS disabled.

4. Reduce the size of jpg file (from 4M to 122K).

5. OK


2022年10月25日 星期二

esp32-cam vehicle

 Ref: https://randomnerdtutorials.com/esp32-cam-car-robot-web-server/

1. ASUS X450J @ Windows 10 x64

2. esp32-cam vehicle from

https://shopee.tw/可手機操控及影像顯示的四輪自走車套件 已裝程式及提供原始碼-全套件含ESP32CAM開發板及電池與電機小車4輪底盤-i.4491023.9451496001

3. Download arduino ide

4. Upload Code to ESP32-CAM AI-Thinker (Arduino IDE)

https://randomnerdtutorials.com/program-upload-code-esp32-cam/

5. After uploading, open the Serial Monitor to get its IP address.

6. 移除GPIO0 接地線

7. Reset 

8. 電腦(手機)瀏覽器 http://192.168.1.131 (Serial monitor 回傳ip)


2022年8月17日 星期三

embeded vlc streaming play

 Ref-https://www.cnblogs.com/cplemom/p/13956092.html

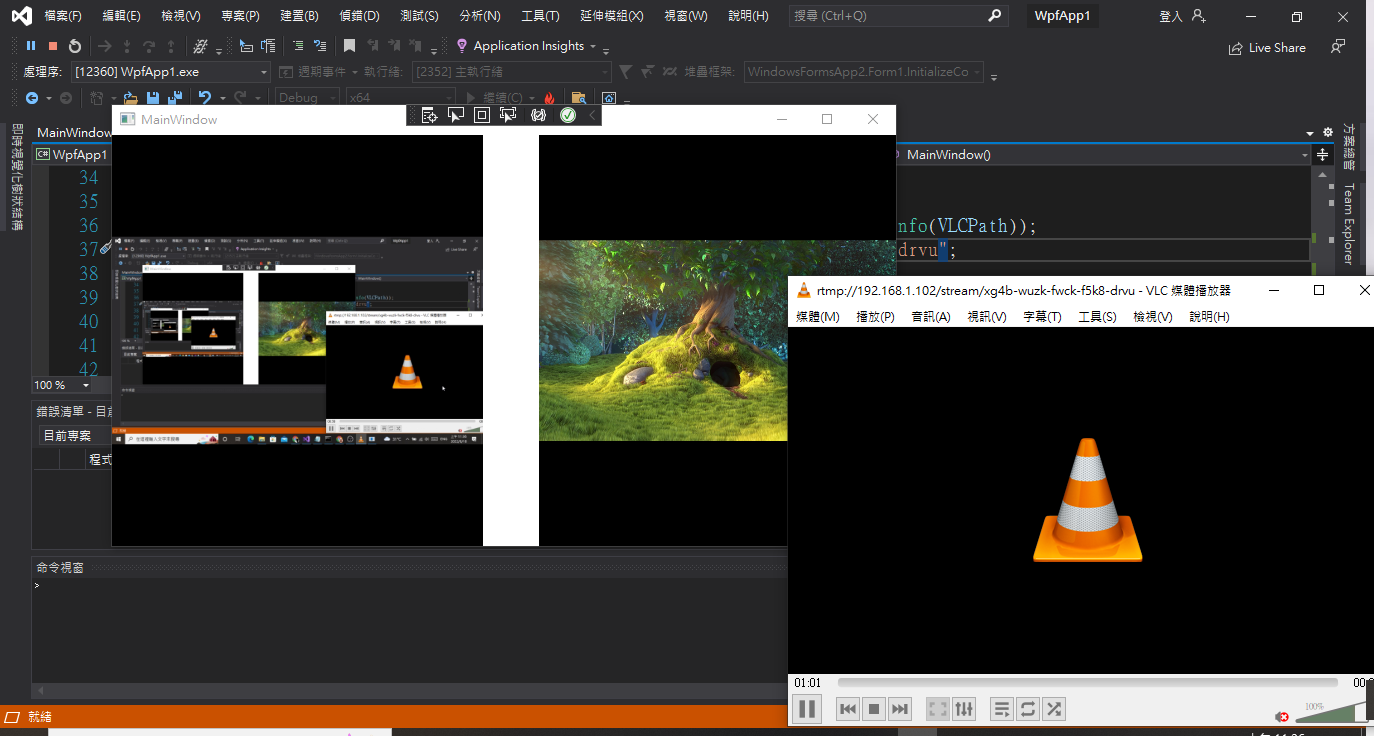
WPF app + embedded vlc players

1. new wpf project   framework 4.7.2

2. add nuget package

Install-Package Vlc.DotNet.Wpf -Version 3.1.0

Vlc.DotNet.Core

Vlc.DotNet.Core.Interops

Vlc.DotNet.Wpf

3. xmal file ; add xmlns 

 xmlns:v="clr-namespace:Vlc.DotNet.Wpf;assembly=Vlc.DotNet.Wpf"

4. xaml file add 2 VlcControl

<Grid x:Name="g1" >

        <Grid>

            <v:VlcControl Name="vlcControl1" Margin="427,0,0,0"/>

        </Grid>

        <Grid>

            <v:VlcControl Name="vlcControl2" Margin="0,0,413,0"/>

        </Grid>

    </Grid>

5. xaml.cs file x64 vlcplay 

InitializeComponent();

string VLCPath = @"C:\Program Files\VideoLAN\VLC";

vlcControl1.SourceProvider.CreatePlayer(new System.IO.DirectoryInfo(VLCPath));

string url = @"https://test-videos.co.uk/vids/bigbuckbunny/mp4/h264/360/Big_Buck_Bunny_360_10s_30MB.mp4";

if (!string.IsNullOrWhiteSpace(url))

{

      vlcControl1.SourceProvider.MediaPlayer.Play(new Uri(url));

}

vlcControl2.SourceProvider.CreatePlayer(new System.IO.DirectoryInfo(VLCPath));

string url2 = @"rtmp://192.168.1.102/stream/passingcode";

            if (!string.IsNullOrWhiteSpace(url2))

            {

                vlcControl2.SourceProvider.MediaPlayer.Play(new Uri(url2));

            }

5. Select x64 mode 

6. excute rtmp://192.168.1.102/stream/passingcode

7. run

8.Result :

2021年11月7日 星期日

julia test (I)

 REF: https://julialang.org/downloads/

julia-1.6.3-win64.exe

Add julia path

Hello world

1) interactive hello world (println)

2) Create ex1.jl

copy con ex1.jl

println("hello world.")

ctrl+z

julia ex1.jl


2021年5月5日 星期三

License_Plate_Recognition_in_CSharp

 REF:

1)https://www.emgu.com/wiki/index.php/License_Plate_Recognition_in_CSharp

2)https://github.com/fasetto/license-plate-recognition/blob/master/src/LPlateRecognition.UI/ViewModels/MainViewModel.cs

Windows 10 x64 @ ASUS X450

Visual Studio 2019

建置程序

1) New FormApp

2) Nuget 

emgu.cv 3.4.3.3016

Tesseract.Net SDK 1.18.342

3) Add class (Ref:1)

using Emgu.CV;
using Emgu.CV.CvEnum;
using Emgu.CV.OCR;
using Emgu.CV.Structure;
using Emgu.CV.Util;
using Emgu.Util;
using Patagames.Ocr;
using Patagames.Ocr.Enums;
//---###
using (UMat tmp = filteredPlate.Clone())
       {
          string plainText;
          using (var api = OcrApi.Create())
          {
            api.Init(Languages.English);
            api.SetVariable("tessedit_char_whitelist", "ABCDEFGHIJKLMNOPQRSTUVWXYZ-1234567890");
            plainText = api.GetTextFromImage(tmp.Bitmap);
           }
           //_ocr.Recognize(tmp);
          //words = _ocr.GetCharacters();
                                //if (words.Length == 0) continue;
                                if (plainText.Length == 0) continue;
                                //for (int i = 0; i < words.Length; i++)
                                for (int i = 0; i < plainText.Length; i++)
                                {
                                    strBuilder.Append(plainText[i]);
                                }
                            }
//---###
4) Form1.cs
public Form1()
        {
            InitializeComponent();
            imageBox1.Image = new Image<Bgr, byte>(@"C:\Users\csjou\Downloads\license-plate2.jpg");
        }

        private void button1_Click(object sender, EventArgs e)
        {
            LicensePlateDetector LPD = new LicensePlateDetector("test");
            Mat m = new Image<Bgr, byte>(imageBox1.Image.Bitmap).Mat;
            List<IInputOutputArray> licensePlateImagesList = new List<IInputOutputArray>();
            List<IInputOutputArray> filteredLicensePlateImagesList = new List<IInputOutputArray>();
            List<RotatedRect> licenseBoxList = new List<RotatedRect>();
            List<string> words = LPD.DetectLicensePlate(
            m,
            licensePlateImagesList,
            filteredLicensePlateImagesList,
            licenseBoxList
            );
            this.Text = "";
            for (int i = 0; i < words.Count; i++)
                this.Text += words[i];
        }


emgu 轉換

 REF: http://ferris2014.blogspot.com/2016/06/opencv-emgu-mat-to-image-image-to-mat.html

Mat to image, image to Mat, image to imagebox, imagebox to image, Mat to imagebox, imagebox to Mat

1. Mat to image

_img = _mat.ToImage<bgr, Byte>();

2. image to Mat

_mat = _img.Mat;

3. image to imagebox

imagebox1.Image=_img;

4. imagebox to image

_img = new Image<bgr, byte>(imageBox1.Image.Bitmap)

5. Mat to imagebox

imagebox1.Image=_mat;

6. imagebox to Mat

(Step4 + Step2)

_img= new Image<bgr, byte>(imageBox1.Image.Bitmap).Mat;

2021年1月26日 星期二

CMake 入門/簡單的範例 (Windows 10)

REF: https://zh.m.wikibooks.org/zh-tw/CMake 入門/簡單的範例

1. Windows 10 x64 @ ASUS X450J

2. Prepare files 

3. cd D:\Course1092\AI1092\cmakes\ex2/src
4. cmake --build .

5. cd Debug
6. ./ex2.exe


2021年1月25日 星期一

Intel OpenVINO Installation & run demo ( could not find any instance of Visual Studio.)

 REF:https://medium.com/ching-i/intel-openvino%E4%BB%8B%E7%B4%B9%E8%88%87%E5%AE%89%E8%A3%9D%E6%95%99%E5%AD%B8-15b07473d998


1. Register Intel Account

2. Download full package

3. Install


4. Upgrade cmake
4-1 Download cmake.msi
https://cmake.org/download/
4-2 Install cmake
cmake-3.19.3-win64-x64.msi
5. Reinstall

6. Done
7. Set vars
C:\Program Files (x86)\Intel\openvino_2021.2.185\bin
8. Install Ironpython
https://github.com/IronLanguages/ironpython2/releases/
9. Add Python path
10. setupvars.bat
11 Add vars

npm install --global --production windows-build-tools --vs2015

--------- Run Demo
Get Started with OpenVINO™ Toolkit on Windows* - OpenVINO™ Toolkit
Powershell

./demo_security_barrier_camera -d CPU
cd "C:\Program Files (x86)\Intel\openvino_2021\deployment_tools\demo"


2020年12月9日 星期三

DataGrid and OleDb Connection Test

1. Windows 10 x64 @ ASUS X450J

2. Visual Studio 2019

3. Install Microsoft Access Database Engine 2010 可轉散發套件

https://www.microsoft.com/zh-tw/download/details.aspx?id=13255

4. Northwind.xls (Customer Sheet)

Ex1 Console (.NET Framework)

using System;

using System.Collections.Generic;

using System.Linq;

using System.Text;

using System.Threading.Tasks;

namespace oledbEx1

{

    using System.Data;

    using System.Data.OleDb;

    class Program

    {

        static void Main(string[] args)

        {

            DataTable DT = OleDbGetTable("SELECT * FROM [Customers$]", "Northwind.xlsx");

            Console.WriteLine(DT.Rows.Count);

            Console.ReadLine();

        }

        static public DataTable OleDbGetTable(string SQL, string path1)

        {

            DataSet DS = new DataSet();

            OleDbConnection conn = new OleDbConnection("Provider=Microsoft.ACE.OLEDB.12.0;Data Source=" + path1 + ";Extended Properties='Excel 12.0 Xml; HDR = YES';");

            conn.Open();

            OleDbDataAdapter apt = new OleDbDataAdapter(SQL, conn);

            apt.Fill(DS);

            conn.Close();

            return DS.Tables[0];

        }

    }

}

 Ex2 Form (.NET Framework)

namespace FormEx1

{

    using System.Data.OleDb;

    public partial class Form1 : Form

    {

        public Form1()

        {

            InitializeComponent();

            DataGridView dataGridView1 = new DataGridView();

            this.Controls.Add(dataGridView1);

            dataGridView1.Dock = DockStyle.Fill;

            DataTable DT = OleDbGetTable("SELECT * FROM [Customers$]", "Northwind.xlsx");

            dataGridView1.DataSource = DT.DefaultView;

        }

        public DataTable OleDbGetTable(string SQL, string path1)

        { ...}

  }

}

Ex3 Form (.NET Core 3.x)

nuget Add System.Data.OleD

Ex4 WPF (.NET Framework)

using System;

using System.Collections.Generic;

using System.Linq;

using System.Text;

using System.Threading.Tasks;

using System.Windows;

using System.Windows.Controls;

using System.Windows.Data;

using System.Windows.Documents;

using System.Windows.Input;

using System.Windows.Media;

using System.Windows.Media.Imaging;

using System.Windows.Navigation;

using System.Windows.Shapes;

namespace WPFEx1

{

    using System.Data.OleDb;

    using System.Data;

    /// <summary>

    /// MainWindow.xaml 的互動邏輯

    /// </summary>

    public partial class MainWindow : Window

    {

        public MainWindow()

        {

            InitializeComponent();

            DataGrid dataGridView1 = new DataGrid();

            Grid G1 = new Grid();

            this.Content = G1;

            G1.Children.Add(dataGridView1);

            DataTable DT = OleDbGetTable("SELECT * FROM [Customers$];", "Northwind.xlsx");

            dataGridView1.ItemsSource = DT.DefaultView;

        }

        public DataTable OleDbGetTable(string SQL, string path1)

        {... }


    }

}

Ex5 WPF (.NET Core 3.x)

nuget Add System.Data.OleD

Ex6 Web (.NET Framework)

using System;

using System.Collections.Generic;

using System.Linq;

using System.Web;

using System.Web.UI;

using System.Web.UI.WebControls;

namespace WebApp1

{

    using System.Data;

    using System.Data.OleDb;

    public partial class WebForm1 : System.Web.UI.Page

    {

        protected void Page_Load(object sender, EventArgs e)

        {

            DataGrid dataGridView1 = new DataGrid();

            form1.Controls.Add(dataGridView1);

            DataTable DT = OleDbGetTable("SELECT * FROM [Customers$];", Server.MapPath("Northwind.xlsx"));

            dataGridView1.DataSource = DT.DefaultView;

            dataGridView1.DataBind();

       }

        public DataTable OleDbGetTable(string SQL, string path1)

        { ...   }

    }

}


2020年11月3日 星期二

Kinect VideoCAM

1. Ref add Microsoft.Kinect 1.8

2.  xaml

<Window x:Class="WPFCam1.MainWindow"

        xmlns="http://schemas.microsoft.com/winfx/2006/xaml/presentation"

        xmlns:x="http://schemas.microsoft.com/winfx/2006/xaml"

        xmlns:d="http://schemas.microsoft.com/expression/blend/2008"

        xmlns:mc="http://schemas.openxmlformats.org/markup-compatibility/2006"

        xmlns:local="clr-namespace:WPFCam1"

        mc:Ignorable="d"

        Title="MainWindow" Height="450" Width="800">

    <Grid>

        <Rectangle Width="320" Height="240">

            <Rectangle.Fill>

                <ImageBrush x:Name="image1">


                </ImageBrush>

            </Rectangle.Fill>

        </Rectangle>

    </Grid>

</Window>

3. C#

using System;

using System.Collections.Generic;

using System.Linq;

using System.Text;

using System.Threading.Tasks;

using System.Windows;

using System.Windows.Controls;

using System.Windows.Data;

using System.Windows.Documents;

using System.Windows.Input;

using System.Windows.Media;

using System.Windows.Media.Imaging;

using System.Windows.Navigation;

using System.Windows.Shapes;


namespace WPFCam1

{

    using Microsoft.Kinect;

    /// <summary>

    /// MainWindow.xaml 的互動邏輯

    /// </summary>

    public partial class MainWindow : Window

    {

        private KinectSensor sensor;

        private WriteableBitmap colorBitmap;

        private byte[] colorPixels;

        public MainWindow()

        {

            InitializeComponent();

            sensor = KinectSensor.KinectSensors[0];

            this.sensor.ColorStream.Enable(ColorImageFormat.RgbResolution640x480Fps30);

            // Allocate space to put the pixels we'll receive

            this.colorPixels = new byte[this.sensor.ColorStream.FramePixelDataLength];

            // This is the bitmap we'll display on-screen

            this.colorBitmap = new WriteableBitmap(this.sensor.ColorStream.FrameWidth, this.sensor.ColorStream.FrameHeight, 96.0, 96.0, PixelFormats.Bgr32, null);

            // Set the image we display to point to the bitmap where we'll put the image data

            this.image1.ImageSource = this.colorBitmap;

            this.sensor.ColorFrameReady += this.SensorColorFrameReady;

            // Start the sensor!

            this.sensor.Start();

        }

        private void SensorColorFrameReady(object sender, ColorImageFrameReadyEventArgs e)

        {

            using (ColorImageFrame colorFrame = e.OpenColorImageFrame())

            {

                if (colorFrame != null)

                {

                    // Copy the pixel data from the image to a temporary array

                    colorFrame.CopyPixelDataTo(this.colorPixels);


                    // Write the pixel data into our bitmap

                    this.colorBitmap.WritePixels(

                        new Int32Rect(0, 0, this.colorBitmap.PixelWidth, this.colorBitmap.PixelHeight),

                        this.colorPixels,

                        this.colorBitmap.PixelWidth * sizeof(int),

                        0);

                }


            }


        }

    }

}


2020年3月16日 星期一

Rotation animation (div)

Ref: https://www.w3schools.com/js/tryit.asp?filename=tryjs_dom_animate_3
<!DOCTYPE html>
<html>
<style>
#myContainer {
  width: 400px;
  height: 400px;
  position: relative;
  background: yellow;
}
/*
center @ 25, 100
*/
#div1 {
  width: 50px;
  height: 200px;
  position: absolute;
  background-color: transpency;

}
/*  25 - w/2 = 50, 100  */
#div2 {
  left: 0px;
  top:100px;
  width: 50px;
  height: 100px;
  position: absolute;
  background-color: blue;
  border-style: solid;
  border-color: green;
}
/*  25 - w/2 = 50, 100  */
#diva {
  width: 50px;
  height: 200px;
  position: absolute;
  background-color: transpency;

}
/*  25 - w/2 = 50, 100  */
#divb {
  left: 0px;
  top:100px;
  width: 50px;
  height: 100px;
  position: absolute;
  background-color: blue;
  border-style: solid;
  border-color: green;
}
</style>
<body>

<p>
<button onclick="myMove()">Click Me</button>
</p>

<div id ="myContainer">

<div id="div1" style="top:0px; left:100px; transform: rotate(-30deg)">
  <div id="div2">
    <div id="diva" style="top:0px; left:0px; transform: rotate(10deg)">
      <div id="divb">

      </div>
    </div>
  </div>
</div>

<script>
function myMove() {

  var pos = -30;
  var dir = 1;
  var c1 = document.getElementById("div1");
  var ca = document.getElementById("diva");
  var id = setInterval(frame, 10);
  function frame() {
    if (pos == 30) {
      clearInterval(id);
    } else {
      redraw();
    }
  }
  function redraw()
  {
    pos++;
    //elem.style.top = pos + 'px';
    //elem.style.left = pos + 'px';
    c1.style.transform = "rotate(" + (pos) + "deg)";
    ca.style.transform = "rotate(" + (pos) + "deg)";
  }
}
</script>

</body>
</html>


2020年1月7日 星期二

git change user error

REF: https://blog.csdn.net/klxh2009/article/details/76019742

git clone xxx
update local files
更新github專案內容
git add .
git config --global user.email "userB@gamil.com"
git config --global user.name "userB"
git commit -m “upload template”
git push -u origin master

-----
check default user
git config --list

D:\Course1081\uTaipei\project\git2\UserB.github.io>git push -u origin master
remote: Permission to userB/userB.github.io.git denied to userA.
fatal: unable to access 'https://github.com/userB/userB.github.io.git/': The requested URL returned error: 403


2019年12月15日 星期日

Razor 頁面中變數在html中的處理方法

Ref: https://stackoverflow.com/questions/3696071/razor-syntax-inside-attributes-of-html-elements-asp-mvc-3

1. for loop 中變數處理問題
<!DOCTYPE html>
<html>
<head>
    <title></title>
</head>
<body>
    @for (int i=1; i<6; i++)
    {
        <a href="wk0@i.html">test0@i</a>
    }
</body>
</html>

在0@間須有space 否則無法視@為變數。

2. 解決方法
<!DOCTYPE html>
<html>
<head>
    <title></title>
</head>
<body>
    @for (int i=1; i<6; i++)
    {
        <a href="wk0@(i).html">test0@(i)</a>
    }
</body>
</html>

2019年12月12日 星期四

WPF webcam capture : 呼叫執行緒無法存取此物件,因為此物件屬於另一個執行緒

Ref: 1.  https://ponchi961.pixnet.net/blog/post/199057831
  2. https://github.com/emgucv/emgucv/blob/master/Emgu.CV.Example/CameraCapture/CameraCapture.cs


VS2017 @ Windows 10x64 : NET.Framework 4.6.1


//---xaml
<Window x:Class="wk1401.MainWindow"
        xmlns="http://schemas.microsoft.com/winfx/2006/xaml/presentation"
        xmlns:x="http://schemas.microsoft.com/winfx/2006/xaml"
        xmlns:d="http://schemas.microsoft.com/expression/blend/2008"
        xmlns:mc="http://schemas.openxmlformats.org/markup-compatibility/2006"
        xmlns:local="clr-namespace:wk1401"
        mc:Ignorable="d"
        Title="MainWindow" Height="450" Width="800">
    <Grid>
        <Image Name="imageBox1"/>
    </Grid>
</Window>
//---xaml.cs
using System;
using System.Collections.Generic;
using System.Linq;
using System.Text;
using System.Threading.Tasks;
using System.Windows;
using System.Windows.Controls;
using System.Windows.Data;
using System.Windows.Documents;
using System.Windows.Input;
using System.Windows.Media;
using System.Windows.Media.Imaging;
using System.Windows.Navigation;
using System.Windows.Shapes;

namespace wk1401
{
    // nuget add emgu.cv
    // ref add System.ServiceModel 4.0
    using Emgu.CV;
    using Emgu.CV.CvEnum;
    using Emgu.CV.Structure;
    using Emgu.Util;
    using System.Drawing;
    using System.IO;
    /// <summary>
    /// MainWindow.xaml 的互動邏輯
    /// </summary>
    public partial class MainWindow : Window
    {
        private VideoCapture _capture = null;
        private Mat _frame;
        public MainWindow()
        {
            InitializeComponent();
            this.Closing += MainWindow_Closing;
            _capture = new VideoCapture();
            _capture.ImageGrabbed += _capture_ImageGrabbed;
            _frame = new Mat();
            _capture.Start();
        }

        private void MainWindow_Closing(object sender, System.ComponentModel.CancelEventArgs e)
        {
            _capture.Dispose();
        }

        private void _capture_ImageGrabbed(object sender, EventArgs e)
        {
            if (_capture != null && _capture.Ptr != IntPtr.Zero)
            {
                _capture.Retrieve(_frame, 0);
                this.Dispatcher.Invoke((Action)(() =>
                {
                    // your code or function here.
                    // https://ponchi961.pixnet.net/blog/post/199057831
                    imageBox1.Source = ConvertBitmapToImageSource(_frame.Bitmap);
                }));
             
            }
        }
        private ImageSource ConvertBitmapToImageSource(Bitmap imToConvert)
        {
            Bitmap bmp = new Bitmap(imToConvert);
            MemoryStream ms = new MemoryStream();
            bmp.Save(ms, System.Drawing.Imaging.ImageFormat.Bmp);
            BitmapImage image = new BitmapImage();
            image.BeginInit();
            ms.Seek(0, SeekOrigin.Begin);
            image.StreamSource = ms;
            image.EndInit();
            ImageSource sc = (ImageSource)image;
            return sc;
        }
    }
}


//---- webcam @ 3D
// Add helixtoolkit.wpf.dll
//-- xaml
<Window x:Class="wk1401.MainWindow"
        xmlns="http://schemas.microsoft.com/winfx/2006/xaml/presentation"
        xmlns:x="http://schemas.microsoft.com/winfx/2006/xaml"
        xmlns:d="http://schemas.microsoft.com/expression/blend/2008"
        xmlns:mc="http://schemas.openxmlformats.org/markup-compatibility/2006"
        xmlns:local="clr-namespace:wk1401"
        xmlns:h="http://helix-toolkit.org/wpf"
        mc:Ignorable="d"
        Title="MainWindow" Height="450" Width="800">
    <Grid>
        <h:HelixViewport3D>
            <h:DefaultLights/>
            <ModelVisual3D>
                <ModelVisual3D.Content>
                    <Model3DGroup >
                        <Model3DGroup.Children>
                            <DirectionalLight Color="#FFFFFFFF" Direction="3,-4,5" />
                            <GeometryModel3D>
                                <GeometryModel3D.Geometry>
                                    <MeshGeometry3D
              Positions="-1 -1 0  1 -1 0  -1 1 0  1 1 0"
              Normals="0 0 1  0 0 1  0 0 1  0 0 1"
              TextureCoordinates="0 1  1 1  0 0  1 0   "
              TriangleIndices="0 1 2  1 3 2" />
                                </GeometryModel3D.Geometry>
                                <GeometryModel3D.Material>
                                    <DiffuseMaterial>
                                        <DiffuseMaterial.Brush>
                                            <ImageBrush x:Name="imageBox1"/>
                                        </DiffuseMaterial.Brush>
                                    </DiffuseMaterial>
                                </GeometryModel3D.Material>
                            </GeometryModel3D>
                        </Model3DGroup.Children>
                    </Model3DGroup>
                </ModelVisual3D.Content>
            </ModelVisual3D>
        </h:HelixViewport3D>
        <!--<Image Name="imageBox1"/>-->
    </Grid>
</Window>
//--- xaml.cs
using System;
using System.Collections.Generic;
using System.Linq;
using System.Text;
using System.Threading.Tasks;
using System.Windows;
using System.Windows.Controls;
using System.Windows.Data;
using System.Windows.Documents;
using System.Windows.Input;
using System.Windows.Media;
using System.Windows.Media.Imaging;
using System.Windows.Navigation;
using System.Windows.Shapes;

namespace wk1401
{
    // nuget add emgu.cv
    // ref add System.ServiceModel 4.0
    using Emgu.CV;
    using Emgu.CV.CvEnum;
    using Emgu.CV.Structure;
    using Emgu.Util;
    using System.Drawing;
    using System.IO;
    /// <summary>
    /// MainWindow.xaml 的互動邏輯
    /// </summary>
    public partial class MainWindow : Window
    {
        private VideoCapture _capture = null;
        private Mat _frame;
        public MainWindow()
        {
            InitializeComponent();
            this.Closing += MainWindow_Closing;
            _capture = new VideoCapture();
            _capture.ImageGrabbed += _capture_ImageGrabbed;
            _frame = new Mat();
            _capture.Start();
        }

        private void MainWindow_Closing(object sender, System.ComponentModel.CancelEventArgs e)
        {
            _capture.Dispose();
        }

        private void _capture_ImageGrabbed(object sender, EventArgs e)
        {
            if (_capture != null && _capture.Ptr != IntPtr.Zero)
            {
                _capture.Retrieve(_frame, 0);
                this.Dispatcher.Invoke((Action)(() =>
                {
                    // your code or function here.
                    // https://ponchi961.pixnet.net/blog/post/199057831
                    //imageBox1.Source = ConvertBitmapToImageSource(_frame.Bitmap);
                    imageBox1.ImageSource = ConvertBitmapToImageSource(_frame.Bitmap);
                }));
               
            }
        }
        private ImageSource ConvertBitmapToImageSource(Bitmap imToConvert)
        {
            Bitmap bmp = new Bitmap(imToConvert);
            MemoryStream ms = new MemoryStream();
            bmp.Save(ms, System.Drawing.Imaging.ImageFormat.Bmp);
            BitmapImage image = new BitmapImage();
            image.BeginInit();
            ms.Seek(0, SeekOrigin.Begin);
            image.StreamSource = ms;
            image.EndInit();
            ImageSource sc = (ImageSource)image;
            return sc;
        }
    }
}


2019年11月23日 星期六

emgu 4.1.1.3497 capture video by a webcam.

ref: https://github.com/emgucv/emgucv/tree/master/Emgu.CV.Example/CameraCapture

Visual Studio 2017 @ Windows 10 x64 @ ASUS  x450J

1. Form Application
1-1. New project by Form Template.
1-2. nuget Add emgu 4.1.1.3497
1-3. Toolbox add Emgu.CV ImageBox (imageBox1)
1-4. Form1.cs
add System.ServiceModel 4.0
namespace wk12webcam
{
    // nuget add emgu.cv
    // ref add System.ServiceModel 4.0
    using Emgu.CV;
    using Emgu.CV.CvEnum;
    using Emgu.CV.Structure;
    using Emgu.Util;

    public partial class Form1 : Form
    {
        private VideoCapture _capture = null;
        private Mat _frame;
        public Form1()
        {
            InitializeComponent();
            this.FormClosing += Form1_FormClosing;
            _capture = new VideoCapture();
            _capture.ImageGrabbed += _capture_ImageGrabbed;
            _frame = new Mat();
            _capture.Start();
        }

        private void Form1_FormClosing(object sender, FormClosingEventArgs e)
        {
            _capture.Dispose();
        }

        private void _capture_ImageGrabbed(object sender, EventArgs e)
        {
            if (_capture != null && _capture.Ptr != IntPtr.Zero)
            {
                _capture.Retrieve(_frame, 0);
                imageBox1.Image = _frame;
            }
        }
    }
}

1-5. Results:


2. WPF
2-1. New project by WPF Template.
2-2. nuget Add emgu 4.1.1.3497
2-3. MainWindow.xaml
 <Grid>
        <Image Name="imageBox1"/>
 </Grid>
2-4. MainWindow.xaml.ccs
Similar procedure causes error as follows

ref: http://csjoublog.blogspot.com/2018/12/emgu-webcam-capture-wpf.html
namespace wk12WPFWebcam
{
    // Add System.ServiceModel 4.0
    using Emgu.CV;
    using Emgu.CV.CvEnum;
    using Emgu.CV.Structure;
    using Emgu.Util;
    using System.Drawing;
    using System.IO;
    using System.Threading;
    using System.Runtime.InteropServices;
    using System.Windows.Interop;

    /// <summary>
    /// MainWindow.xaml 的互動邏輯
    /// </summary>
    public partial class MainWindow : Window
    {
        private VideoCapture _capture = null;
        private Mat _frame;
        public MainWindow()
        {
            InitializeComponent();
            this.Closing += MainWindow_Closing;
            _capture = new VideoCapture();
            //_capture.ImageGrabbed += _capture_ImageGrabbed;
            _frame = new Mat();
            //_capture.Start();
            ComponentDispatcher.ThreadIdle += ComponentDispatcher_ThreadIdle;
        }

        private void ComponentDispatcher_ThreadIdle(object sender, EventArgs e)
        {
            using (var imageFrame = _capture.QueryFrame().ToImage<Bgr, Byte>())
            {
                if (imageFrame != null)
                {
                    imageBox1.Source = ConvertBitmapToImageSource(imageFrame.Bitmap);
                }
            }
        }
        private void MainWindow_Closing(object sender, System.ComponentModel.CancelEventArgs e)
        {
            _capture.Dispose();
        }
        private ImageSource ConvertBitmapToImageSource(Bitmap imToConvert)
        {
            Bitmap bmp = new Bitmap(imToConvert);
            MemoryStream ms = new MemoryStream();
            bmp.Save(ms, System.Drawing.Imaging.ImageFormat.Bmp);
            BitmapImage image = new BitmapImage();
            image.BeginInit();
            ms.Seek(0, SeekOrigin.Begin);
            image.StreamSource = ms;
            image.EndInit();
            ImageSource sc = (ImageSource)image;
            return sc;
        }
    }
}

2019年11月22日 星期五

emgu (4.1.1.3497) WPF example 2019/11/23

Ref: https://github.com/emgucv/emgucv/tree/master/Emgu.CV.Example/WPF

1. Visual Studio 2017 @ Windows 10 x64 @ ASUS X450J
2. emgu WPF example
3. failure : mat to image.source
    image1.Source = image.ToBitmapSource();
4. 轉換 mat to image.imagesource @ WPF
https://frasergreenroyd.com/how-to-convert-opencv-cvmat-to-system-bitmap-to-system-imagesource/
         private void image1_Initialized(object sender, EventArgs e)
        {
            Mat image = new Mat(100, 400, DepthType.Cv8U, 3);
            image.SetTo(new Bgr(255, 255, 255).MCvScalar);
            CvInvoke.PutText(image, "Hello, world", new System.Drawing.Point(10, 50),           Emgu.CV.CvEnum.FontFace.HersheyPlain, 3.0, new Bgr(255.0, 0.0, 0.0).MCvScalar);
            image1.Source = ConvertBitmapToImageSource(image.Bitmap); //.ToBitmapSource();
        }

        private ImageSource ConvertBitmapToImageSource(Bitmap imToConvert)
        {
            Bitmap bmp = new Bitmap(imToConvert);
            MemoryStream ms = new MemoryStream();
            bmp.Save(ms, System.Drawing.Imaging.ImageFormat.Bmp);
            BitmapImage image = new BitmapImage();
            image.BeginInit();
            ms.Seek(0, SeekOrigin.Begin);
            image.StreamSource = ms;
            image.EndInit();
            ImageSource sc = (ImageSource)image;
            return sc;
        }

2019年11月14日 星期四

csjou.github.io 建置程序

Ref: https://lazyteatime.like.community/2019/03/13/《如何在github架網站》%EF%BC%9A簡易教學/

Windows 10 x64 @ ASUS X450J

1. github.com 建立帳號
2. 登入
3. 建立 xxx.github.io 專案  (xxx : username)

4.建立首頁 index.html
<html>
<head>
       <title> csjou @ github </title>
</head>
<body>
     <h1> csjou@github test </h1>
     <marquee>走馬燈標籤測試</marquee>
</body>
</html>


5. https://xxx.github.io/
6. 測試 page2
 (Ref:https://www.w3schools.com/bootstrap/tryit.asp?filename=trybs_theme_me_grid&stacked=h)


2019年10月21日 星期一

jekyll blog 建置

1. jekyll 套件有blog template,可見置static blog, 發佈到github,使用https://csjou-hwu.github.io/


Ref: https://ithelp.ithome.com.tw/articles/10198964


2. Windows 10 x64 @ ASUS DM6660

3. https://jekyllrb.com/docs/installation/windows/

Install Ruby @ Windows 10

    3-1 download https://rubyinstaller.org/downloads/
Ruby+Devkit 2.6.5-1 (x64)  132MB

    3-2 Install


    3-3 Enable Linux sub System

    3-3 Download/Install Ubuntu 18.04 LTS


    sudo apt-get update -y && sudo apt-get upgrade -y       //很久
    sudo apt-add-repository ppa:brightbox/ruby-ng
    sudo apt-get update
    sudo apt-get install ruby2.5 ruby2.5-dev build-essential dh-autoreconf
    sudo gem update
    sudo gem install jekyll bundler
--- Takes longer time far more than what I was expected.
4. jekyll new myblog1

5. cd blog

6. bundle exec jekyll serve --host=0.0.0.0


git clone https://github.com/csjou-hwu/csjou-hwu.github.io.git


2019年10月13日 星期日

helixtoolkit 3D基本元件

ASUS X450J @ Windows 10 x64/ VS2017

<h:HelixViewport3D>
            <h:HelixViewport3D.Camera>
                <PerspectiveCamera Position="0 0 50"
                                   LookDirection="0 0 -1"
                                   UpDirection="0 1 0"/>
            </h:HelixViewport3D.Camera>
            <h:DefaultLights/>
            <!-- 3D Model -->
<h:HelixViewport3D>

1.  <h:BillboardVisual3D Position="1 1 40" Width="240" Height="140"></h:BillboardVisual3D>
2. <h:BillboardTextVisual3D Position="1 1 40" Text="周重石" FontSize="60"/>

3. <h:ArrowVisual3D Point1="-20 7 0" Point2="1 1 40" Diameter="1" Direction="1 1 0"></h:ArrowVisual3D>
4. <h:BoxVisual3D Center="1 1 30" Width="2" Height="2" Length="2"  Fill="Green" />
5. <h:CubeVisual3D Center="1 1 30" SideLength="2"  >
6. <h:EllipsoidVisual3D Center="1 1 30" PhiDiv="3" RadiusX="2" RadiusY="2" RadiusZ="3">

7. <h:HelixVisual3D  Diameter="3" Fill="GreenYellow" Length="25" Radius="1">
8. <h:LinesVisual3D Color="Black" Thickness="15"  Points="0 0 0 5 5 0">
9. <h:PieSliceVisual3D Center="0 -10 0" Fill="Red" EndAngle="120" StartAngle="0" OuterRadius="20" InnerRadius="5">
10. <h:RectangleVisual3D Length="5"    LengthDirection="1 1 1" Width="2">
11. <h:PipeVisual3D Diameter="10" Fill="Yellow" InnerDiameter="5" Point1="0 0 0" Point2="-10 -10 0"  >
12.<h:SphereVisual3D Radius="5" Center="-10 0 0"/>
13. <h:TubeVisual3D AddCaps="True" Angles="45" Diameter="8" Fill="Aqua" Path="0 0 0 -10 10 10 -10 10 -10">