1. In emgu face detection, the default settings was framework 3.5 while the System.Threading.Task seems conflict with library. Open the project by framework 3.5 and then change to 4.6 with remark //System,.Threading.Task.
2. Microsoft Oxford project face detection api installed by framework 4.5 and the System.Threading.Task is needed.
2016年12月13日 星期二
2016年11月10日 星期四
Windows 10 can't find the 2nd HD (IDE to AHCI)
Ref: http://www.tenforums.com/drivers-hardware/15006-attn-ssd-owners-enabling-ahci-mode-after-windows-10-installation.html
ASUS X450J /Replace DVD to SSD with Windows 10
Follow the procedure by REF
1. Run Command Prompt as Admin
2. Invoke a Safe Mode boot with the command: bcdedit /set {current} safeboot minimal
3. Restart the PC and enter your BIOS during bootup.
4. Change from IDE to AHCI mode then Save & Exit.
5. Windows 10 will launch in Safe Mode.
6. Right click the Window icon and select to run the Command Prompt in Admin mode from among the various options.
7. Cancel Safe Mode booting with the command: bcdedit /deletevalue {current} safeboot
8. Restart your PC once more and this time it will boot up normally but with AHCI mode activated.
9. Bask in the reflected glory of being a total Windows 10 God
It's work.
2016年9月13日 星期二
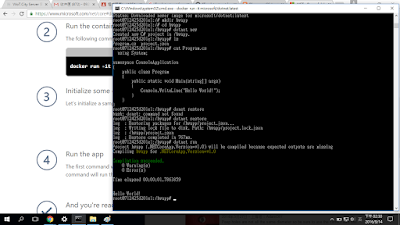
.NET Core (Docker)
Ref: https://www.microsoft.com/net/core#docker
ASUS X450J (Win10 Edux64)
1. docker run -it microsoft/dotnet:latest
2. Create new project
2.1 mkdir hwapp
2.2 cd hwapp
2.3 dotnet new
Create Project.json and Program.cs files
Can be checked by cat Program.cs
3. dotnet restore
4. dotnet run
5. Results:
ASUS X450J (Win10 Edux64)
1. docker run -it microsoft/dotnet:latest
2. Create new project
2.1 mkdir hwapp
2.2 cd hwapp
2.3 dotnet new
Create Project.json and Program.cs files
Can be checked by cat Program.cs
3. dotnet restore
4. dotnet run
5. Results:

Tag latest not found in repository docker.io/wotcity/wotcity-io
Ref: https://github.com/docker/docker-registry/issues/637
ASUS X450J (Windows 10 Edux64)
Docker
1. Follow Ref:https://wotcity.com/blog/2015/09/07/installation-guide/
2. docker pull wotcity/wotcity-io
Error : Tag latest not found in repository docker.io/wotcity/wotcity-io
3. Solve by
docker pull -a wotcity/wotcity-io

ASUS X450J (Windows 10 Edux64)
Docker
1. Follow Ref:https://wotcity.com/blog/2015/09/07/installation-guide/
2. docker pull wotcity/wotcity-io
Error : Tag latest not found in repository docker.io/wotcity/wotcity-io
3. Solve by
docker pull -a wotcity/wotcity-io

2016年9月12日 星期一
Youtube 直播 (Windows 10)
ASUS X450J (Windows 10 Edu x64)
1. 下載 OBS (Latest Windows Release - 0.15.4)
https://obsproject.com/download#mp
2. 安裝 OBS
3. 設定場景,來源

4. Chrome 啟用Youtube (記得要登入)
5. 選擇我的頻道
6. 進入影片管理員

7. 選擇即時串流(設定標題,紀錄伺服器網址url,金鑰)
8. 回到OBS設定(Preference)

9. 在串流選擇
9.1 串流類型:自訂串流伺服器
9.2 將youtube url / 串流金鑰 依序設定
10. 回到OBS主視窗右下角,開始串流
...
11. 回到OBS主視窗右下角,停止串流
1. 下載 OBS (Latest Windows Release - 0.15.4)
https://obsproject.com/download#mp
2. 安裝 OBS
3. 設定場景,來源

4. Chrome 啟用Youtube (記得要登入)
5. 選擇我的頻道
6. 進入影片管理員

7. 選擇即時串流(設定標題,紀錄伺服器網址url,金鑰)

9. 在串流選擇
9.1 串流類型:自訂串流伺服器
9.2 將youtube url / 串流金鑰 依序設定
10. 回到OBS主視窗右下角,開始串流
...
11. 回到OBS主視窗右下角,停止串流
2016年8月28日 星期日
Emgu face detect
Ref: http://www.codeproject.com/Articles/462527/Camera-Face-Detection-in-Csharp-Using-Emgu-CV-Open
ASUS X450 J with Windows 10 x64 Education
Visual Studio 2015 (update 1)
1. 測試程式
1.1 下載 emgu 3.1.0.0 版 失敗
emgu.cv.dll 已併入 emgu.cv.world.dll ... 其他原因待測試
2 emgucv-windows-universal-cuda 2.9.0.1922 OK
2.1 下載 emgu 解壓縮.
2.2 下載 code Project 程式解壓縮
2.3 Visual Studio 2015 開啟專案
2.4 重新加入參考
emgu.cv
emgu.cv.util
emgu.cv.ui
2.5 修改專案屬性建置輸出為
D:\Emgu\emgucv-windows-universal-cuda 2.9.0.1922\bin
(emgy解壓縮路徑)
3 測試OK。
2016年8月19日 星期五
Mac lua tutorial 2 (http server)
Ref http://lua-users.org/wiki/CopasExample
1. Macbook pro (OS X EI Captian 10.11.5)
2. lua 5.2.4
brew install lua
注意 : 下載 lua 5.3.3 for Mac
Download lua for Mac 5.3.3
http://luabinaries.sourceforge.net/download.html
3. 安裝copas
luarocks install copas
4. 安裝 socket
sudo luarocks install luasocket
5. 參考範例備妥 luaCopasEx3.lua
-- Ref http://lua-users.org/wiki/CopasExample
-- Test OK 2016/8/18
-- luaCopasEx3.lua
-- lua -E luaCopasEx3.lua
local socket = require("socket")
local copas = require("copas")
function handler(c, host, port)
local peer = host .. ":" .. port
print("connection from", peer)
c:send("Hello 中文試試看\r\n")
print("data from", peer, (c:receive"*l"))
end
copas.addserver(assert(socket.bind("*",2220)),
function(c) return handler(copas.wrap(c), c:getpeername()) end
)
copas.loop()
6. 結果

2016年8月18日 星期四
Youtube 直播 (Mac)
Macbook pro (OS X EI Captian 10.11.5)
1. 下載 OBS
https://obsproject.com/download#mac
2. 安裝 OBS
3. 設定場景,來源

4. Chrome 啟用Youtube (記得要登入)
5. 選擇我的頻道
6. 進入影片管理員

7. 選擇即時串流(設定標題,紀錄伺服器網址url,金鑰)

8. 回到OBS設定(Preference)

9. 在串流選擇
9.1 串流類型:自訂串流伺服器
9.2 將youtube url / 串流金鑰 依序設定
10. 回到OBS主視窗右下角,開始串流
...
11. 回到OBS主視窗右下角,停止串流
1. 下載 OBS
https://obsproject.com/download#mac
2. 安裝 OBS
3. 設定場景,來源

4. Chrome 啟用Youtube (記得要登入)
5. 選擇我的頻道
6. 進入影片管理員

7. 選擇即時串流(設定標題,紀錄伺服器網址url,金鑰)

8. 回到OBS設定(Preference)

9. 在串流選擇
9.1 串流類型:自訂串流伺服器
9.2 將youtube url / 串流金鑰 依序設定
10. 回到OBS主視窗右下角,開始串流
...
11. 回到OBS主視窗右下角,停止串流
2016年8月14日 星期日
Mac lua tutorial - 1 (Hello world)
Macbook pro (OS X EI Captian 10.11.5)
lua-5.3.3-0.pkg 2016-06-06 0.43
1. lua Hello world
1.1 準備 luaHello.lua
-- luaHello.lua
-- lua -E luaHello.lua
print ("Hello World!")
1.2 執行 (@bash) lua -E luaHello.lua

2. lua function
2.1 準備檔案
-- luaFunction.lua
-- lua -E luaFunction.lua
foo = function () print("hello") end -- declare the function
foo() -- call the function
2.2 執行

-- luaIO.lua
-- lua -E luaIO.lua
print ("enter a integer for n ")
n=io.read("*n") --not *number
if (n<0) then return 1 end
sum = 0
i = 1 --0 has no effect :)?
while (i<=n) do
sum = sum + i^2
i = i + 1
end
print(sum)
3.2 執行

lua-5.3.3-0.pkg 2016-06-06 0.43
1. lua Hello world
1.1 準備 luaHello.lua
-- luaHello.lua
-- lua -E luaHello.lua
print ("Hello World!")
1.2 執行 (@bash) lua -E luaHello.lua

2.1 準備檔案
-- luaFunction.lua
-- lua -E luaFunction.lua
foo = function () print("hello") end -- declare the function
foo() -- call the function
2.2 執行

3. lua IO
3.1 準備檔案-- luaIO.lua
-- lua -E luaIO.lua
print ("enter a integer for n ")
n=io.read("*n") --not *number
if (n<0) then return 1 end
sum = 0
i = 1 --0 has no effect :)?
while (i<=n) do
sum = sum + i^2
i = i + 1
end
print(sum)
3.2 執行

2016年8月13日 星期六
Mac lua compiler installation
Ref: 1. http://rudamoura.com/luaonmacosx.html
2. http://rudix.org/packages/lua.html
Macbook pro (OS X EI Captian 10.11.5)
1. Download lua compiler
El Capitan (10.11) lua-5.3.3-0.pkg 2016-06-06 0.43
2. 執行 lua-5.3.3-0;pkg (需輸入密碼)
3. 進入終端機模式(bash)
4. lua

2. http://rudix.org/packages/lua.html
Macbook pro (OS X EI Captian 10.11.5)
1. Download lua compiler
El Capitan (10.11) lua-5.3.3-0.pkg 2016-06-06 0.43
2. 執行 lua-5.3.3-0;pkg (需輸入密碼)
3. 進入終端機模式(bash)
4. lua

2016年8月9日 星期二
Mac 3D graphic by game template (III) Create 3D objects by DAE file
Ref: 1. http://stackoverflow.com/questions/25356301/how-do-you-load-a-dae-file-into-an-scnnode-in-ios-scenekit
2. https://www.weheartswift.com/introduction-scenekit-part-2/
Macbook pro (OS X EI Captian 10.11.5)
Xcode 7.3.1案例以Game Template 開始,移除原範本加入的Ship與動畫(Animation),再參考Ref1 將匯入的DAE檔案轉為node物件,再加入至場景內
1. 開啟遊戲範本專案
2. GameViewController.swft2.1 關閉ship節點與“動畫”指令
2.2 參考Ref1將DAE檔案轉為節點,並加入場景
...

4. 參考Ref1,將DAE轉換node動作轉為方法.
2. https://www.weheartswift.com/introduction-scenekit-part-2/
Macbook pro (OS X EI Captian 10.11.5)
Xcode 7.3.1案例以Game Template 開始,移除原範本加入的Ship與動畫(Animation),再參考Ref1 將匯入的DAE檔案轉為node物件,再加入至場景內
1. 開啟遊戲範本專案
2. GameViewController.swft2.1 關閉ship節點與“動畫”指令
2.2 參考Ref1將DAE檔案轉為節點,並加入場景
...
// create a new scene
//let scene = SCNScene(named: "art.scnassets/ship.scn")!
let scene = SCNScene();
//-- 2016-8-10
var nodeS = SCNNode()
let sceneS = SCNScene(named: "mug.dae")
var nodeArrayS = sceneS!.rootNode.childNodes
for childNode in nodeArrayS {
nodeS.addChildNode(childNode as SCNNode)
}
scene.rootNode.addChildNode(nodeS)
// create and add a camera to the scene
let cameraNode = SCNNode()
...
3. 結果
4. 參考Ref1,將DAE轉換node動作轉為方法.
class GameViewController: UIViewController {
//----- Def DAE2Node方法
func collada2SCNNode(filepath:String) -> SCNNode {
var node = SCNNode()
let scene = SCNScene(named: filepath)
var nodeArray = scene!.rootNode.childNodes
for childNode in nodeArray {
node.addChildNode(childNode as SCNNode)
}
return node
}
//------
override func viewDidLoad() {
super.viewDidLoad()
...
//-- 2016-8-10-B
/*
var nodeS = SCNNode()
let sceneS = SCNScene(named: "mug.dae")
var nodeArrayS = sceneS!.rootNode.childNodes
for childNode in nodeArrayS {
nodeS.addChildNode(childNode as SCNNode)
}
*/
let nodeS = collada2SCNNode("mug.dae")
scene.rootNode.addChildNode(nodeS)
...
5. 用迴圈呼叫方法,產生系列3D物件
...
*/
6. 結果

5. 用迴圈呼叫方法,產生系列3D物件
...
*/
for zz in 1...3 {
let nodeS = collada2SCNNode("mug.dae")
nodeS.position = SCNVector3(x:0, y:0, z:Float(zz)*3)
scene.rootNode.addChildNode(nodeS)
}
...6. 結果

2016年8月8日 星期一
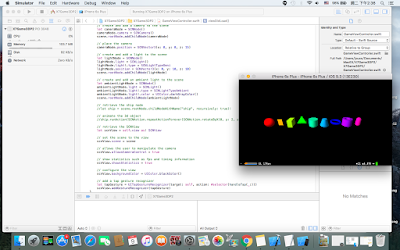
Mac 3D graphic by game template (II) Create 3D objects by loop
Ref: https://www.weheartswift.com/introduction-scenekit-part-2/
Macbook pro (OS X EI Captian 10.11.5)
Xcode 7.3.1案例以Game Template 開始,移除原範本加入的Ship與動畫(Animation),再參考範例以迴圈加入內建3D物件
進階
1. 開啟遊戲範本專案
2. GameViewController.swft
4. 加入動畫(可在加入3D物件進入場景前設定)

Macbook pro (OS X EI Captian 10.11.5)
Xcode 7.3.1案例以Game Template 開始,移除原範本加入的Ship與動畫(Animation),再參考範例以迴圈加入內建3D物件
進階
1. 開啟遊戲範本專案
2. GameViewController.swft
override func viewDidLoad() {
super.viewDidLoad()
// create a new scene
//let scene = SCNScene(named: "art.scnassets/ship.scn")! 移除Ship
let scene = SCNScene(); //建立空白場景
// 建立內建3D物件
var geometries = [SCNSphere(radius: 1.0),
SCNPlane(width: 1.0, height: 1.5),
SCNBox(width: 1.0, height: 1.5, length: 2.0, chamferRadius: 0.0),
SCNPyramid(width: 2.0, height: 1.5, length: 1.0),
SCNCylinder(radius: 1.0, height: 1.5),
SCNCone(topRadius: 0.5, bottomRadius: 1.0, height: 1.5),
SCNTorus(ringRadius: 1.0, pipeRadius: 0.2),
SCNTube(innerRadius: 0.5, outerRadius: 1.0, height: 1.5),
SCNCapsule(capRadius: 0.5, height: 2.0)]
var x:Float = 0.0
for index in 0..<geometries.count {
let hue:CGFloat = CGFloat(index) / CGFloat(geometries.count)
let color = UIColor(hue: hue, saturation: 1.0, brightness: 1.0, alpha: 1.0)
let geometry = geometries[index]
geometry.firstMaterial?.diffuse.contents = color
let node = SCNNode(geometry: geometry)
node.position = SCNVector3(x: x, y: 0.0, z: 0.0)
scene.rootNode.addChildNode(node)
x += 2.5
}
// create and add a camera to the scene
let cameraNode = SCNNode()
cameraNode.camera = SCNCamera()
scene.rootNode.addChildNode(cameraNode)
// place the camera
cameraNode.position = SCNVector3(x: 0, y: 0, z: 15)
// create and add a light to the scene
let lightNode = SCNNode()
lightNode.light = SCNLight()
lightNode.light!.type = SCNLightTypeOmni
lightNode.position = SCNVector3(x: 0, y: 10, z: 10)
scene.rootNode.addChildNode(lightNode)
// create and add an ambient light to the scene
let ambientLightNode = SCNNode()
ambientLightNode.light = SCNLight()
ambientLightNode.light!.type = SCNLightTypeAmbient
ambientLightNode.light!.color = UIColor.darkGrayColor()
scene.rootNode.addChildNode(ambientLightNode)
// retrieve the ship node
//let ship = scene.rootNode.childNodeWithName("ship", recursively: true)!
// animate the 3d object
//ship.runAction(SCNAction.repeatActionForever(SCNAction.rotateByX(0, y: 2, z: 0, duration: 1)))
...
3. 結果:

4. 加入動畫(可在加入3D物件進入場景前設定)
if index == 0 {
// Animation
let moveUp = SCNAction.moveByX(0.0, y: 1.0, z: 0.0, duration: 1.0)
let moveDown = SCNAction.moveByX(0.0, y: -1.0, z: 0.0, duration: 1.0)
let sequence = SCNAction.sequence([moveUp,moveDown])
node.runAction(SCNAction.repeatActionForever(sequence))
//let moveUp = SCNAction.moveByX(0.0, y: 1.0, z: 0.0, duration: 1.0)
//node.runAction(SCNAction.repeatActionForever(moveUp))
}
scene.rootNode.addChildNode(node)

Mac 3D graphic by game template
Ref: https://www.weheartswift.com/introduction-scenekit-part-1/
Macbook pro (OS X EI Captian 10.11.5)
Xcode 7.3.1
案例以Game Template 開始,移除原範本加入的Ship與動畫(Animation),再參考範例加入3D物件
1. 開啟遊戲範本專案
2. GamViewController.swift

Macbook pro (OS X EI Captian 10.11.5)
Xcode 7.3.1
案例以Game Template 開始,移除原範本加入的Ship與動畫(Animation),再參考範例加入3D物件
1. 開啟遊戲範本專案
2. GamViewController.swift
class GameViewController: UIViewController {
override func viewDidLoad() {
super.viewDidLoad()
// create a new scene 1.3 移除 ship 物件
// let scene = SCNScene(named: "art.scnassets/ship.scn")!
// 1.4 add Empty SCNScene 建置空場景
let scene = SCNScene()
// 1.5 加入圓
let sphereGeometry = SCNSphere(radius: 1.0)
sphereGeometry.firstMaterial?.diffuse.contents = UIColor.orangeColor()
let sphereNode = SCNNode(geometry: sphereGeometry)
scene.rootNode.addChildNode(sphereNode)
// create and add a camera to the scene 0.1 加入相機
let cameraNode = SCNNode()
cameraNode.camera = SCNCamera()
scene.rootNode.addChildNode(cameraNode)
// place the camera
cameraNode.position = SCNVector3(x: 0, y: 0, z: 15)
// create and add a light to the scene 0.2 加入Omni光源
let lightNode = SCNNode()
lightNode.light = SCNLight()
lightNode.light!.type = SCNLightTypeOmni
lightNode.position = SCNVector3(x: 0, y: 10, z: 10)
scene.rootNode.addChildNode(lightNode)
// create and add an ambient light to the scene
let ambientLightNode = SCNNode()
ambientLightNode.light = SCNLight()
ambientLightNode.light!.type = SCNLightTypeAmbient
ambientLightNode.light!.color = UIColor.darkGrayColor()
scene.rootNode.addChildNode(ambientLightNode)
// retrieve the ship node 1.1 移除 ship 動畫
//let ship = scene.rootNode.childNodeWithName("ship", recursively: true)!
// animate the 3d object 1.2 移除 ship 動畫
//ship.runAction(SCNAction.repeatActionForever(SCNAction.rotateByX(0, y: 2, z: 0, duration: 1)))
// retrieve the SCNView
let scnView = self.view as! SCNView
// set the scene to the view
scnView.scene = scene
// allows the user to manipulate the camera
scnView.allowsCameraControl = true
// show statistics such as fps and timing information
scnView.showsStatistics = true
// configure the view
scnView.backgroundColor = UIColor.blackColor()
// add a tap gesture recognizer
let tapGesture = UITapGestureRecognizer(target: self, action: #selector(handleTap(_:)))
scnView.addGestureRecognizer(tapGesture)
}
3. Result

Mac 3D graphic w/o game template
Ref: https://www.weheartswift.com/introduction-scenekit-part-1/
Macbook pro (OS X EI Captian 10.11.5)
Xcode 7.3.1
案例以Single View Template 始,依序加入SceneKit Framework, PrimitivesScene.swift(建置繼承SCNView 類別的PrimitivesScene類別),在PrimitivesScene類別建構元方法中建置3D物件,在ViewController的載入方法(viewDidLoad)中加入以PrimitivesScene類別建置的場景物件與,相機等物件.細部步驟:
1. Open New SingleView
2. 加入SceneKit Framework
2.1 選取專案目標(Target)
2.2 選取 Build Phases
2.3 在Link Binary With Libraries 選取+ (加入程式庫)
2.4 搜尋SceneKit.framework

3. 專案中建立新類別(加入檔案 PrimitivesScene.swift)
空白檔案僅有 import Foundation
import Foundation
//---- 依序建立繼承SCNScene類別的場景類別
import SceneKit
// 3.1. Add class 繼承 SCNScene
class PrimitivesScene : SCNScene {
// 3.2. Add init() method and required ... (auto fixed)
override init() {
super.init()
// 3.3. Add 圓
let sphereGeometry = SCNSphere(radius: 0.5)
let sphereNode = SCNNode(geometry: sphereGeometry)
self.rootNode.addChildNode(sphereNode)
// 3.4. Add 2nd circle
let secondSphereGeometry = SCNSphere(radius: 1.0)
let secondSphereNode = SCNNode(geometry: secondSphereGeometry)
secondSphereNode.position = SCNVector3(x: 3.0, y: 0.0, z: 0.0)
self.rootNode.addChildNode(secondSphereNode)
}
// 3.1.2 選取自動修正產生
required init?(coder aDecoder: NSCoder) {
fatalError("init(coder:) has not been implemented")
}
}
3.5 3.2-3.4 可先測試完再依序加入
4. viewController.swift 建置程序
// 4.2.配合MVC的方式,先在 Main.storyboard 加入 Scene Kit View 物件
import UIKit
// 4.1. Add import
import SceneKit
class ViewController: UIViewController {
// 4. 3, 以輔助視窗將(View)Main.storyboad的控制項連結至(Control)類別
// Connect Scene Kit View
@IBOutlet weak var scnview: SCNView!
override func viewDidLoad() {
super.viewDidLoad()
// Do any additional setup after loading the view, typically from a nib.
// 4.2-4.3 取代原範例 let scnview = self.view as! SCNView
scnview.scene = PrimitivesScene()
scnview.backgroundColor = UIColor.blackColor()
scnview.autoenablesDefaultLighting = true
scnview.allowsCameraControl = true
}
override func didReceiveMemoryWarning() {
super.didReceiveMemoryWarning()
// Dispose of any resources that can be recreated.
}
}
5. Result

訂閱:
文章 (Atom)