Ref: http://www.codeproject.com/Articles/462527/Camera-Face-Detection-in-Csharp-Using-Emgu-CV-Open
ASUS X450 J with Windows 10 x64 Education
Visual Studio 2015 (update 1)
1. 測試程式
1.1 下載 emgu 3.1.0.0 版 失敗
emgu.cv.dll 已併入 emgu.cv.world.dll ... 其他原因待測試
2 emgucv-windows-universal-cuda 2.9.0.1922 OK
2.1 下載 emgu 解壓縮.
2.2 下載 code Project 程式解壓縮
2.3 Visual Studio 2015 開啟專案
2.4 重新加入參考
emgu.cv
emgu.cv.util
emgu.cv.ui
2.5 修改專案屬性建置輸出為
D:\Emgu\emgucv-windows-universal-cuda 2.9.0.1922\bin
(emgy解壓縮路徑)
3 測試OK。
2016年8月28日 星期日
2016年8月19日 星期五
Mac lua tutorial 2 (http server)
Ref http://lua-users.org/wiki/CopasExample
1. Macbook pro (OS X EI Captian 10.11.5)
2. lua 5.2.4
brew install lua
注意 : 下載 lua 5.3.3 for Mac
Download lua for Mac 5.3.3
http://luabinaries.sourceforge.net/download.html
3. 安裝copas
luarocks install copas
4. 安裝 socket
sudo luarocks install luasocket
5. 參考範例備妥 luaCopasEx3.lua
-- Ref http://lua-users.org/wiki/CopasExample
-- Test OK 2016/8/18
-- luaCopasEx3.lua
-- lua -E luaCopasEx3.lua
local socket = require("socket")
local copas = require("copas")
function handler(c, host, port)
local peer = host .. ":" .. port
print("connection from", peer)
c:send("Hello 中文試試看\r\n")
print("data from", peer, (c:receive"*l"))
end
copas.addserver(assert(socket.bind("*",2220)),
function(c) return handler(copas.wrap(c), c:getpeername()) end
)
copas.loop()
6. 結果

2016年8月18日 星期四
Youtube 直播 (Mac)
Macbook pro (OS X EI Captian 10.11.5)
1. 下載 OBS
https://obsproject.com/download#mac
2. 安裝 OBS
3. 設定場景,來源

4. Chrome 啟用Youtube (記得要登入)
5. 選擇我的頻道
6. 進入影片管理員

7. 選擇即時串流(設定標題,紀錄伺服器網址url,金鑰)

8. 回到OBS設定(Preference)

9. 在串流選擇
9.1 串流類型:自訂串流伺服器
9.2 將youtube url / 串流金鑰 依序設定
10. 回到OBS主視窗右下角,開始串流
...
11. 回到OBS主視窗右下角,停止串流
1. 下載 OBS
https://obsproject.com/download#mac
2. 安裝 OBS
3. 設定場景,來源

4. Chrome 啟用Youtube (記得要登入)
5. 選擇我的頻道
6. 進入影片管理員

7. 選擇即時串流(設定標題,紀錄伺服器網址url,金鑰)

8. 回到OBS設定(Preference)

9. 在串流選擇
9.1 串流類型:自訂串流伺服器
9.2 將youtube url / 串流金鑰 依序設定
10. 回到OBS主視窗右下角,開始串流
...
11. 回到OBS主視窗右下角,停止串流
2016年8月14日 星期日
Mac lua tutorial - 1 (Hello world)
Macbook pro (OS X EI Captian 10.11.5)
lua-5.3.3-0.pkg 2016-06-06 0.43
1. lua Hello world
1.1 準備 luaHello.lua
-- luaHello.lua
-- lua -E luaHello.lua
print ("Hello World!")
1.2 執行 (@bash) lua -E luaHello.lua

2. lua function
2.1 準備檔案
-- luaFunction.lua
-- lua -E luaFunction.lua
foo = function () print("hello") end -- declare the function
foo() -- call the function
2.2 執行

-- luaIO.lua
-- lua -E luaIO.lua
print ("enter a integer for n ")
n=io.read("*n") --not *number
if (n<0) then return 1 end
sum = 0
i = 1 --0 has no effect :)?
while (i<=n) do
sum = sum + i^2
i = i + 1
end
print(sum)
3.2 執行

lua-5.3.3-0.pkg 2016-06-06 0.43
1. lua Hello world
1.1 準備 luaHello.lua
-- luaHello.lua
-- lua -E luaHello.lua
print ("Hello World!")
1.2 執行 (@bash) lua -E luaHello.lua

2.1 準備檔案
-- luaFunction.lua
-- lua -E luaFunction.lua
foo = function () print("hello") end -- declare the function
foo() -- call the function
2.2 執行

3. lua IO
3.1 準備檔案-- luaIO.lua
-- lua -E luaIO.lua
print ("enter a integer for n ")
n=io.read("*n") --not *number
if (n<0) then return 1 end
sum = 0
i = 1 --0 has no effect :)?
while (i<=n) do
sum = sum + i^2
i = i + 1
end
print(sum)
3.2 執行

2016年8月13日 星期六
Mac lua compiler installation
Ref: 1. http://rudamoura.com/luaonmacosx.html
2. http://rudix.org/packages/lua.html
Macbook pro (OS X EI Captian 10.11.5)
1. Download lua compiler
El Capitan (10.11) lua-5.3.3-0.pkg 2016-06-06 0.43
2. 執行 lua-5.3.3-0;pkg (需輸入密碼)
3. 進入終端機模式(bash)
4. lua

2. http://rudix.org/packages/lua.html
Macbook pro (OS X EI Captian 10.11.5)
1. Download lua compiler
El Capitan (10.11) lua-5.3.3-0.pkg 2016-06-06 0.43
2. 執行 lua-5.3.3-0;pkg (需輸入密碼)
3. 進入終端機模式(bash)
4. lua

2016年8月9日 星期二
Mac 3D graphic by game template (III) Create 3D objects by DAE file
Ref: 1. http://stackoverflow.com/questions/25356301/how-do-you-load-a-dae-file-into-an-scnnode-in-ios-scenekit
2. https://www.weheartswift.com/introduction-scenekit-part-2/
Macbook pro (OS X EI Captian 10.11.5)
Xcode 7.3.1案例以Game Template 開始,移除原範本加入的Ship與動畫(Animation),再參考Ref1 將匯入的DAE檔案轉為node物件,再加入至場景內
1. 開啟遊戲範本專案
2. GameViewController.swft2.1 關閉ship節點與“動畫”指令
2.2 參考Ref1將DAE檔案轉為節點,並加入場景
...

4. 參考Ref1,將DAE轉換node動作轉為方法.
2. https://www.weheartswift.com/introduction-scenekit-part-2/
Macbook pro (OS X EI Captian 10.11.5)
Xcode 7.3.1案例以Game Template 開始,移除原範本加入的Ship與動畫(Animation),再參考Ref1 將匯入的DAE檔案轉為node物件,再加入至場景內
1. 開啟遊戲範本專案
2. GameViewController.swft2.1 關閉ship節點與“動畫”指令
2.2 參考Ref1將DAE檔案轉為節點,並加入場景
...
// create a new scene
//let scene = SCNScene(named: "art.scnassets/ship.scn")!
let scene = SCNScene();
//-- 2016-8-10
var nodeS = SCNNode()
let sceneS = SCNScene(named: "mug.dae")
var nodeArrayS = sceneS!.rootNode.childNodes
for childNode in nodeArrayS {
nodeS.addChildNode(childNode as SCNNode)
}
scene.rootNode.addChildNode(nodeS)
// create and add a camera to the scene
let cameraNode = SCNNode()
...
3. 結果
4. 參考Ref1,將DAE轉換node動作轉為方法.
class GameViewController: UIViewController {
//----- Def DAE2Node方法
func collada2SCNNode(filepath:String) -> SCNNode {
var node = SCNNode()
let scene = SCNScene(named: filepath)
var nodeArray = scene!.rootNode.childNodes
for childNode in nodeArray {
node.addChildNode(childNode as SCNNode)
}
return node
}
//------
override func viewDidLoad() {
super.viewDidLoad()
...
//-- 2016-8-10-B
/*
var nodeS = SCNNode()
let sceneS = SCNScene(named: "mug.dae")
var nodeArrayS = sceneS!.rootNode.childNodes
for childNode in nodeArrayS {
nodeS.addChildNode(childNode as SCNNode)
}
*/
let nodeS = collada2SCNNode("mug.dae")
scene.rootNode.addChildNode(nodeS)
...
5. 用迴圈呼叫方法,產生系列3D物件
...
*/
6. 結果

5. 用迴圈呼叫方法,產生系列3D物件
...
*/
for zz in 1...3 {
let nodeS = collada2SCNNode("mug.dae")
nodeS.position = SCNVector3(x:0, y:0, z:Float(zz)*3)
scene.rootNode.addChildNode(nodeS)
}
...6. 結果

2016年8月8日 星期一
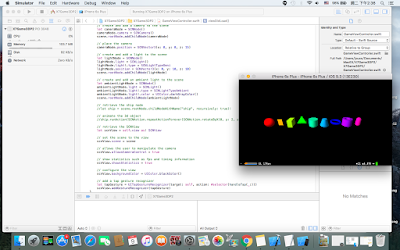
Mac 3D graphic by game template (II) Create 3D objects by loop
Ref: https://www.weheartswift.com/introduction-scenekit-part-2/
Macbook pro (OS X EI Captian 10.11.5)
Xcode 7.3.1案例以Game Template 開始,移除原範本加入的Ship與動畫(Animation),再參考範例以迴圈加入內建3D物件
進階
1. 開啟遊戲範本專案
2. GameViewController.swft
4. 加入動畫(可在加入3D物件進入場景前設定)

Macbook pro (OS X EI Captian 10.11.5)
Xcode 7.3.1案例以Game Template 開始,移除原範本加入的Ship與動畫(Animation),再參考範例以迴圈加入內建3D物件
進階
1. 開啟遊戲範本專案
2. GameViewController.swft
override func viewDidLoad() {
super.viewDidLoad()
// create a new scene
//let scene = SCNScene(named: "art.scnassets/ship.scn")! 移除Ship
let scene = SCNScene(); //建立空白場景
// 建立內建3D物件
var geometries = [SCNSphere(radius: 1.0),
SCNPlane(width: 1.0, height: 1.5),
SCNBox(width: 1.0, height: 1.5, length: 2.0, chamferRadius: 0.0),
SCNPyramid(width: 2.0, height: 1.5, length: 1.0),
SCNCylinder(radius: 1.0, height: 1.5),
SCNCone(topRadius: 0.5, bottomRadius: 1.0, height: 1.5),
SCNTorus(ringRadius: 1.0, pipeRadius: 0.2),
SCNTube(innerRadius: 0.5, outerRadius: 1.0, height: 1.5),
SCNCapsule(capRadius: 0.5, height: 2.0)]
var x:Float = 0.0
for index in 0..<geometries.count {
let hue:CGFloat = CGFloat(index) / CGFloat(geometries.count)
let color = UIColor(hue: hue, saturation: 1.0, brightness: 1.0, alpha: 1.0)
let geometry = geometries[index]
geometry.firstMaterial?.diffuse.contents = color
let node = SCNNode(geometry: geometry)
node.position = SCNVector3(x: x, y: 0.0, z: 0.0)
scene.rootNode.addChildNode(node)
x += 2.5
}
// create and add a camera to the scene
let cameraNode = SCNNode()
cameraNode.camera = SCNCamera()
scene.rootNode.addChildNode(cameraNode)
// place the camera
cameraNode.position = SCNVector3(x: 0, y: 0, z: 15)
// create and add a light to the scene
let lightNode = SCNNode()
lightNode.light = SCNLight()
lightNode.light!.type = SCNLightTypeOmni
lightNode.position = SCNVector3(x: 0, y: 10, z: 10)
scene.rootNode.addChildNode(lightNode)
// create and add an ambient light to the scene
let ambientLightNode = SCNNode()
ambientLightNode.light = SCNLight()
ambientLightNode.light!.type = SCNLightTypeAmbient
ambientLightNode.light!.color = UIColor.darkGrayColor()
scene.rootNode.addChildNode(ambientLightNode)
// retrieve the ship node
//let ship = scene.rootNode.childNodeWithName("ship", recursively: true)!
// animate the 3d object
//ship.runAction(SCNAction.repeatActionForever(SCNAction.rotateByX(0, y: 2, z: 0, duration: 1)))
...
3. 結果:

4. 加入動畫(可在加入3D物件進入場景前設定)
if index == 0 {
// Animation
let moveUp = SCNAction.moveByX(0.0, y: 1.0, z: 0.0, duration: 1.0)
let moveDown = SCNAction.moveByX(0.0, y: -1.0, z: 0.0, duration: 1.0)
let sequence = SCNAction.sequence([moveUp,moveDown])
node.runAction(SCNAction.repeatActionForever(sequence))
//let moveUp = SCNAction.moveByX(0.0, y: 1.0, z: 0.0, duration: 1.0)
//node.runAction(SCNAction.repeatActionForever(moveUp))
}
scene.rootNode.addChildNode(node)

Mac 3D graphic by game template
Ref: https://www.weheartswift.com/introduction-scenekit-part-1/
Macbook pro (OS X EI Captian 10.11.5)
Xcode 7.3.1
案例以Game Template 開始,移除原範本加入的Ship與動畫(Animation),再參考範例加入3D物件
1. 開啟遊戲範本專案
2. GamViewController.swift

Macbook pro (OS X EI Captian 10.11.5)
Xcode 7.3.1
案例以Game Template 開始,移除原範本加入的Ship與動畫(Animation),再參考範例加入3D物件
1. 開啟遊戲範本專案
2. GamViewController.swift
class GameViewController: UIViewController {
override func viewDidLoad() {
super.viewDidLoad()
// create a new scene 1.3 移除 ship 物件
// let scene = SCNScene(named: "art.scnassets/ship.scn")!
// 1.4 add Empty SCNScene 建置空場景
let scene = SCNScene()
// 1.5 加入圓
let sphereGeometry = SCNSphere(radius: 1.0)
sphereGeometry.firstMaterial?.diffuse.contents = UIColor.orangeColor()
let sphereNode = SCNNode(geometry: sphereGeometry)
scene.rootNode.addChildNode(sphereNode)
// create and add a camera to the scene 0.1 加入相機
let cameraNode = SCNNode()
cameraNode.camera = SCNCamera()
scene.rootNode.addChildNode(cameraNode)
// place the camera
cameraNode.position = SCNVector3(x: 0, y: 0, z: 15)
// create and add a light to the scene 0.2 加入Omni光源
let lightNode = SCNNode()
lightNode.light = SCNLight()
lightNode.light!.type = SCNLightTypeOmni
lightNode.position = SCNVector3(x: 0, y: 10, z: 10)
scene.rootNode.addChildNode(lightNode)
// create and add an ambient light to the scene
let ambientLightNode = SCNNode()
ambientLightNode.light = SCNLight()
ambientLightNode.light!.type = SCNLightTypeAmbient
ambientLightNode.light!.color = UIColor.darkGrayColor()
scene.rootNode.addChildNode(ambientLightNode)
// retrieve the ship node 1.1 移除 ship 動畫
//let ship = scene.rootNode.childNodeWithName("ship", recursively: true)!
// animate the 3d object 1.2 移除 ship 動畫
//ship.runAction(SCNAction.repeatActionForever(SCNAction.rotateByX(0, y: 2, z: 0, duration: 1)))
// retrieve the SCNView
let scnView = self.view as! SCNView
// set the scene to the view
scnView.scene = scene
// allows the user to manipulate the camera
scnView.allowsCameraControl = true
// show statistics such as fps and timing information
scnView.showsStatistics = true
// configure the view
scnView.backgroundColor = UIColor.blackColor()
// add a tap gesture recognizer
let tapGesture = UITapGestureRecognizer(target: self, action: #selector(handleTap(_:)))
scnView.addGestureRecognizer(tapGesture)
}
3. Result

Mac 3D graphic w/o game template
Ref: https://www.weheartswift.com/introduction-scenekit-part-1/
Macbook pro (OS X EI Captian 10.11.5)
Xcode 7.3.1
案例以Single View Template 始,依序加入SceneKit Framework, PrimitivesScene.swift(建置繼承SCNView 類別的PrimitivesScene類別),在PrimitivesScene類別建構元方法中建置3D物件,在ViewController的載入方法(viewDidLoad)中加入以PrimitivesScene類別建置的場景物件與,相機等物件.細部步驟:
1. Open New SingleView
2. 加入SceneKit Framework
2.1 選取專案目標(Target)
2.2 選取 Build Phases
2.3 在Link Binary With Libraries 選取+ (加入程式庫)
2.4 搜尋SceneKit.framework

3. 專案中建立新類別(加入檔案 PrimitivesScene.swift)
空白檔案僅有 import Foundation
import Foundation
//---- 依序建立繼承SCNScene類別的場景類別
import SceneKit
// 3.1. Add class 繼承 SCNScene
class PrimitivesScene : SCNScene {
// 3.2. Add init() method and required ... (auto fixed)
override init() {
super.init()
// 3.3. Add 圓
let sphereGeometry = SCNSphere(radius: 0.5)
let sphereNode = SCNNode(geometry: sphereGeometry)
self.rootNode.addChildNode(sphereNode)
// 3.4. Add 2nd circle
let secondSphereGeometry = SCNSphere(radius: 1.0)
let secondSphereNode = SCNNode(geometry: secondSphereGeometry)
secondSphereNode.position = SCNVector3(x: 3.0, y: 0.0, z: 0.0)
self.rootNode.addChildNode(secondSphereNode)
}
// 3.1.2 選取自動修正產生
required init?(coder aDecoder: NSCoder) {
fatalError("init(coder:) has not been implemented")
}
}
3.5 3.2-3.4 可先測試完再依序加入
4. viewController.swift 建置程序
// 4.2.配合MVC的方式,先在 Main.storyboard 加入 Scene Kit View 物件
import UIKit
// 4.1. Add import
import SceneKit
class ViewController: UIViewController {
// 4. 3, 以輔助視窗將(View)Main.storyboad的控制項連結至(Control)類別
// Connect Scene Kit View
@IBOutlet weak var scnview: SCNView!
override func viewDidLoad() {
super.viewDidLoad()
// Do any additional setup after loading the view, typically from a nib.
// 4.2-4.3 取代原範例 let scnview = self.view as! SCNView
scnview.scene = PrimitivesScene()
scnview.backgroundColor = UIColor.blackColor()
scnview.autoenablesDefaultLighting = true
scnview.allowsCameraControl = true
}
override func didReceiveMemoryWarning() {
super.didReceiveMemoryWarning()
// Dispose of any resources that can be recreated.
}
}
5. Result

iPhone 模擬器雙指動作
Ref:http://stackoverflow.com/questions/13275832/how-to-mimic-two-finger-scroll-drag-gesture-on-ios-simulator
Macbook pro (OS X EI Captian 10.11.5)
Xcode 7.3.1
1. Alt鍵 + 滑鼠 (Zoom)
2. Alt+ Shift 鍵 + 滑鼠 (Pan)
Macbook pro (OS X EI Captian 10.11.5)
Xcode 7.3.1
1. Alt鍵 + 滑鼠 (Zoom)
2. Alt+ Shift 鍵 + 滑鼠 (Pan)
2016年8月3日 星期三
Mac OSX Game 2
Ref:https://www.raywenderlich.com/119815/sprite-kit-swift-2-tutorial-for-beginners
Macbook pro (OS X EI Captian 10.11.5)
Xcode 7.3.1
1. 準備ninja.png monster.png
2. 開啟新Game專案
3. 取消Portrait設定
4. 刪除 GameScene.sks (本例不需)
5. 開啟Assets.xcassets
載入 ninja.png, monster.png
6. 開啟GameScene.swift
以程式加入小圖片(Sprite)
7. 加入ninja.png (name : player)
// 1
let player = SKSpriteNode(imageNamed: "Player")
override func didMoveToView(view: SKView) {
// 2
backgroundColor = SKColor.whiteColor()
// 3
player.position = CGPoint(x: size.width * 0.1, y: size.height * 0.5)
// 4
addChild(player)
8. 以程式加入 monster
//----- 2016.8.3
runAction(SKAction.repeatActionForever(
SKAction.sequence([
SKAction.runBlock(addMonster),
SKAction.waitForDuration(1.0)
])
))
//-----
9. 加入mouseDown (iOS 用touchesEnded )
//------
override func mouseDown(theEvent: NSEvent) {
// 1 - Choose one of the touches to work with
//guard let touch = touches.first else {
// return
//}
let touchLocation = theEvent.locationInNode(self); //touch.locationInNode(self)
....
10. Result

訂閱:
文章 (Atom)